How to Start a New Academic Term Online
The following guide applies to the process of copying an ONLINE or HYBRID course for a given academic period; it is extensible to web-supported courses with substantial content in Blackboard Learn. The Academic Computing Unit supports faculty during this process; however, the key steps of copying must be carried out by the instructor in charge of the course as she or he is the only one who knows the curriculum details for determining that the course is alright. The following steps assure a flawless transition to the new term.
1. Be sure that your department has listed the course(s) in the corresponding Class Schedule of The Bulldog Connection as mode of instruction ONLINE or HYBRID; it is the only clear indicator to the students that the entire content or part of it would be delivered online.

2. We recommend using the master or DEV course model for your course copies. The master course becomes the central location for any changes and improvements you make each semester to your course’s design and curriculum. Master shells are never removed from BSU Online whereas individual course shells are eventually rotated out of circulation and purged from the system. Copying from a master course instead of a term course also guarantees that no private information of previous students such as discussion posts or grades is passed to a new course. A master shell is designated by the DEV tag (e.g., FRSE101-DEV) -- if you do not have a master shell, please submit a ticket to the Help Desk helpdesk@bowiestate.edu.
3. Open the DEV template and verify it has all critical components such as "Start Here!-->About this Course" (syllabus, instructor information,..), course multimedia content found in "Course Materials", "Modules" or "Course Weeks", depending on the schema used by the author; Assignments, Discussions, Full Grade Center Columns, and Groups (if you use this feature). Open Full Grade Center-->Manage-->Column organization to determine if scores are correctly added into the Total Column (points system) or Weighted Total (percentage system).
All of the above, are key components of online pedagogy under Quality Matters standards; absence of any of these components strongly would impair the course quality and negatively affect students. It may happen that a certain semester version of the course is more current than the DEV template; then, consult with Academic Computing how to do partial changes to the master template -this must be always the most current. A key component to check is the Grade Center; it must have all the required columns for grading the course activities and either the Total Column or the Weighted Column; if it is the latter, all scores must be based on 100 or the sum of percentages will be different to 100%. To determine how scores are added, use Full Grade Center-->Manage-->Column Organization; check that each column has the desired points and there are no hidden columns adding to the grade -make them visible or delete the column. If you do not know how to delete a column, please call Academic Computing. Only one column must be set to "External Grade" (PeopleSoft Grade), either Total for points system or Weighted Grade for percentage system; edit the corresponding column and select "Set as External Grade", then delete the other column to avoid confusion of students. Once you have verified that the template is OK, you will make it the SOURCE for copy.
4. This step is bulleted because it is a sequence by itself:
- Go to the Courses Tab and "Course List" to open the new course that will be properly identified with a CourseID, a section and a term. This will be your DESTINATION course.
- Open it to find some standard content inserted by Academic Computing to prevent offering empty shells to students. We recommend deleting some of this content if you already have it in the SOURCE to avoid duplications.
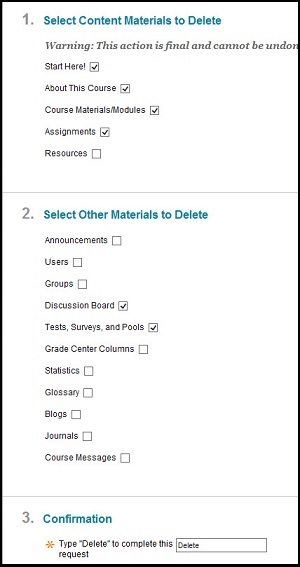
- On the Control Panel, expand the Packages and Utilities section and select Bulk Delete; chose elements to delete if they already exist in the SOURCE; then Submit . Do not delete "Learner's Resources" as this is a compendium of BSU's academic resources that is added to all courses for compliance with Quality Matters. The Bulk Delete operation will prevent that some material is duplicated in the new course.
- The form below indicates some common elements to delete from the standard template, but review carefully your SOURCE. Notice that "Learner's Resources" is not deleted.
5. This step is also bulleted as a sequence:
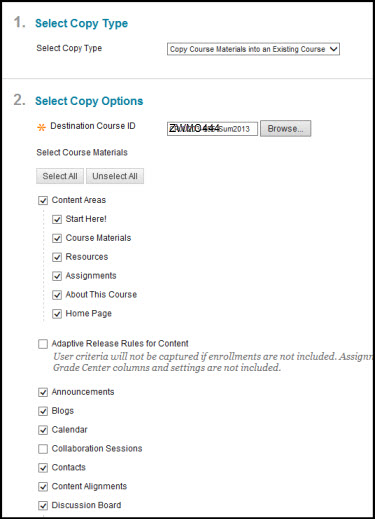
- Begin with the SOURCE course. On the Control Panel, expand the Packages and Utilities section and select Course Copy.
- Select "Copy Course Materials into an Existing Course".
- Click browse and select the DESTINATION course from the popup window; Submit at the bottom of the popup window so the DESTINATION course will appear into the Browse slot.
- Select the course materials that you want to copy over to the course, you can start with "Select All" and then deselect those that do not apply. Notice the following:
- If you copy assignments and tests, must copy also Grade Center Columns as these are connected
- Do not copy "Settings" if you want to preserve the apperance of the new course and the tools such as Smarthinking, Attendance, and Zoom
- In the File Attachments section, leave the default:
- Copy links and copies of the content. Reason: if you make updates to your DEV file, as recommended to improve your course, the changes will not affect the course that is already copied.
- Finally, Submit at the bottom of the form. You will do this procedure only one time as each successive copy would append replicas of materials that you already have done. If you noticed that the copy did not go through or just went partially, contact Academic Computing for solution - this requires careful "course surgery" to avoid further damage.
- After you click Submit, Blackboard will begin the Course Copy. Depending on how big your course is, this process may take some time. You will receive an email from Blackboard when the system is finished. NOTE: While copying, the course availability of the source course is applied to the destination course. If the destination course's availability is set to unavailable, but the original course is available, the destination course's availability is changed. Consult with Academic Computing if the procedure failed.
6. Open the DESTINATION course; an orange band on top of the screen will indicate that the copy is completed; close it. Inspect the course components, some of them may be out of order and you just move them grabbing from the left arrows. If there are duplicate elements in the course menu -e.g. two Attendance delete one. The rule is that older components are towards the top of the menu and older componets are towards the bottom. Now is time to update all temporary elements of the course. This includes Welcome Message, Syllabus, Course Schedule, Instructor Information, due dates for assignments and tests, etc. An easy way to update deadlines for assignments is to use Course Management-->Course Tools-->Date Management; all dates are shown on one page and you can change them individually and check to save. After this, your course is ready to go!
Final Recommendation: We strongly recommend you use Course Management-->Content Collection-->Course ID to manage large files. The Content Collection will ensure that only one copy of these files resides on the server whereas copying content from course to course creates multiple files. Links to Content Collection items in a course are copied during a course copy operation. When a course is copied, linked content access is updated so that the newly copied course has the same access as the course from which it was copied. For the same reason, avoid placing large video or audio files directly in the course; they can be linked through YouTube.com that is free. Blackboard is not intended to be a streaming media server for movie or sound files as it is externally hosted.